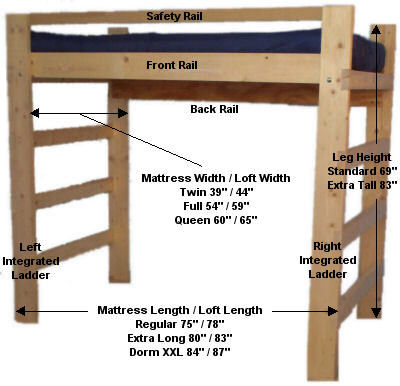
Tools Needed
- Power screwdriver with a phillips #2 medium head bit.
- Adjustable (or 9/16") wrench.
- Hammer.
Optional Items
- Sandpaper.
- Wood glue.
- Paint.
Notes
Setup takes roughly 1 hour. It is easiest if you have two people doing it. If you are not sure how to install a piece always refer back to the picture above to see how everything fits together. Please read through the entire instructions to familiarize yourself first before beginning assembly.
You should always check the setup instructions on our web site to make sure you have the latest version. Compare the updated date at the top of this page with the web page updated date. If the web instructions are newer, you should download the newer instructions.
The wood used in your loft will typically have a (good) side and a (bad) side. The bad side will usually have a lumber grading stamp or some imperfections. Before assembly lay all the pieces out on the floor and try to position the wood with the “good” side facing up or out. Take into consideration which side you usually will be climbing up on and place the best rungs and legs on that side.
Pilot holes have been predrilled into all necessary pieces.
You may want to add soap to the screws, the soap acts as a lubricant and makes driving them into the wood easier.
Step One

Assemble the left ladder. Lay the left front leg and left back leg on the floor with the notches facing up. The rail hole is positioned towards the top of the legs. Note: For added strength you may optionally place wood glue at the base of each notch at this point. Insert rungs into the notches lining them up flush with the front and back legs. Use 2-1/2 In. screws to fasten each rung to the legs. Drive the screws nice and tight. While driving the screws, make sure there is no gap between the rung and the leg. Suggestion, drive the screw half-way into the leg, then unscrew it so it is just comes out of the leg, then drive it all the way in. The screw should recess about 1/4 In. into the rung to make a nice tight fit. Note, due to temperature and humidity differences the rungs may have expanded and may need to be slightly sanded to fit. Now repeat and assemble the right ladder.
Step Two
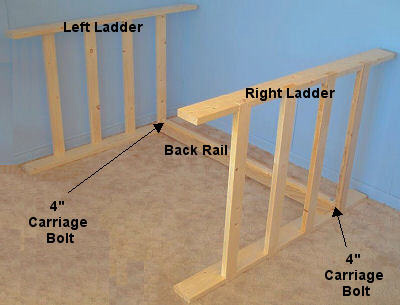
From the back insert one 4" carriage bolt into the hole of each back leg. Lay the ladder ends on their backs as shown on right. Lay the back rail between the ladder ends. The back rail is positioned with the shorter side above the bolts and the longer side below the bolts. Place a washer, lock washer and nut on each of the bolts and loosely hand tighten the nuts..
Step Three
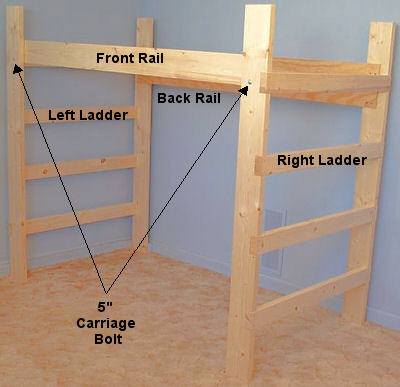
Lift the unit to its upright position. From the front insert a 5 In. carriage bolt into the hole in each of the front legs. From the inside place the front rail between the front ladder ends, the ledge must be facing inside and at the bottom of the front rail. Place a washer, lock washer and nut on each of the bolts and loosely hand tighten the nuts.
Step Four
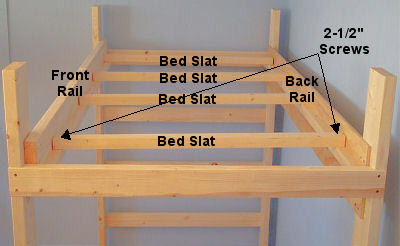
Insert the bed slats between the front and back rails, evenly spacing them apart. You can now completely tighten the carriage bolts. Fasten the bed slats to the front and back rails using 2-1/2 In. screws.
Step Five


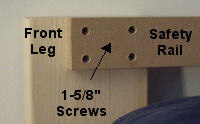
Fasten the back rail to the back legs with four 1-5/8" screws at each end. Fasten the front bed rail to the front legs with four 2˝” screws at each end. Place your mattress support and mattress on the loft.
To save space we suggest you use a plywood platform to support the mattress. We recommend using 1/2 In. 4-ply plywood. The plywood platform needs to be cut to the same size as the mattress. For example, if you ordered a 39 In. x 75 In. loft, you need a 39 In. x 75 In. plywood platform. For the Full (54 In. wide) and Queen (60 In. wide) mattress sizes, you will need 2 sheets. For the Full (54 In. wide) size, the first plywood sheet will be 48 In. wide and the second sheet will be 6 In. wide. For the Queen (60 In. wide) size, you will need a 48 In. wide and 12 In. wide sheets.
If you have a bookshelf, front ladder or other options you may install them now.
Step Six
Fasten the safety rail to the inside of the front legs 2 In. – 3 In. above the top of the mattress with four 1-5/8 In. screws at each end.
The loft is now complete. The loft should be tight and not rock in any direction. If it does rock, try the following: Did you use a power screwdriver? Make sure you drive the screws nice and tight. With the 1-1/2 In. thick wood, the screws should be recessed about 1/4 In. to make a tight fit. Try un-screwing them one at a time and re-tightening them. What direction does it move? When standing at the front (long rail side) does it move left to right or front to back? If left to right then the screws in the front and back rail should be tightened. If it moves front to back then the rungs in the ladder ends need to be tightened. You can also place some wood glue inside the notches before inserting the rungs. This should give you a nice tight fit.
Included in this Shipment
(4) Ladder Legs 2x6 In. x Standard Height Legs 69 In. or Extra Tall Legs 83 In.
(8) Ladder Rungs 2x6 In. x Twin 44 In., Full 59 In., Queen 65 In. (10 Rungs with Extra Tall Legs)
(1) Front Rail 2x6 In. w/2x2 Ledge x Regular 75 In., Extra Long 80 In., Dorm XL 84 In.
(1) Back Rail 1/2 In. Plywood w/2x2 Ledge x Regular 75 In., Extra Long 80 In., Dorm XL 84 In.
(4) Bed Slats 1-1/2 In. thick x Twin 39 In., Full 54 In., Queen 60 In.
(1) Safety Rail 2x6 In. x Regular 75 In., Extra Long 80 In., Dorm XL 84 In.
(1) Parts Bag of Bolts & Screws Includes:
(2) Carriage Bolts 3/8 In. x 4 In.
(2) Carriage Bolts 3/8 In. x 5 In.
(4) Each 3/8 In. Washers, Lock Washers, Hex Nuts.
(48) 2-1/2 In. Drywall Screws to fasten the Rungs to Legs, Front Rail to the Legs and Bed Slats to the Front and Back Rails.
(16) 1-5/8 In. Drywall Screws to fasten the Back Rail to the Legs and Safety Rail to the Legs.
Warranty
USM Manufacturing warrantees its products for 1 year from the date of your receipt of merchandise. During this time we will repair or replace defective components that we consider defective due to materials or workmanship. We will not replace components due to user misuse, modification or improper installation. In the event components are damaged due to user misuse, modification or improper installation, College Bed Lofts will replace components upon owners request and expense.
Components that are warped, damaged or missing during shipping will be replaced by USM Manufacturing. In some cases to expedite this process we may ask the customer to purchase the replacement components locally and you will be reimbursed for actual replacement costs.
Refunds will only be granted up to 30 days after receipt of your loft. Orders cancelled prior to shipping will receive a full refund. For orders cancelled after shipping, customer must pay for the original shipping cost and shipping cost to return the loft to us or another location. Returned units will be inspected, if returned unit is undamaged and in new condition the customer will receive a refund of the purchase price less the original shipping cost less a 15% return processing and restocking fee. If damaged due to improper packaging during the return, the customer will receive a refund less the cost to repair or replace the damaged components, less the original shipping costs, less the 15% return processing and restocking fee.
The following lofts may not be returned nor refunded: Customized lofts; painted lofts; lofts purchased in a group discount program; lofts purchased in a fundraising program; loft purchased in bulk using a purchase order.
Prior to returning the unit to us, the customer must contact us to obtain a Return Authorization (RA) number, the RA number must be written on all returned packages. Lofts returned without RA numbers will not be refunded.
Safety Guidelines
The Wooden College Loft Bed was designed utilizing the Consumer Products Safety Commission (CPSC) safety guidelines for bunk beds. The loft was designed and intended to be used for college student use, the loft should not be used by children under the age of 6. If modifications or alternations are made it must conform to the CPSC Document #071 requirements.
Since USM Manufacturing cannot control the quality of the assembly nor modifications made to the loft, we will not be held legally liable from any accidents, injuries or property damage resulting from the use of our loft.
Because of the very nature of sleeping on an elevated surface, there are obvious and inherent risks involved due to falling. This risk is enhanced when consciousness is limited or impaired due to sleep, lack of sleep, illness, consumption of alcohol, taking medications, inhalation of smoke/fumes or similar factors. The loft is an all natural wood product and will burn when fire or sufficient heat is present. Elevated beds may also create obstructions or impediments that increase the hazards encountered in a fire or other emergency by hindering evacuation or fire suppression activities. Customers who choose to use our loft shall be deemed to have assumed all risks of accidents, injury and property damage associated with their use.
As a general safety precaution do not place the loft near any window, door, closet, fire/smoke alarm or ceiling fan. All college residence halls have specific requirements regarding the use and placement of lofts and students are required to follow all college requirements. The safety rail must be in use at all times.